
 |
| Welcome to the Markovian Main Event! |
 Congratulations! You have made your way to the final and most difficult mission of the Markovian Campaign. You have finally arrived at Port Crescent with your armada and are ready to invade and take back this port from the rebel forces. Z2Live has done a fine job on the design of this mission – it has multiple layers that you will have to work thru in a well designed port city complete with many detailed buildings, factories, bridges, sea walls, airport, tunnels and a town square that you will eventually have to take down if you are to succeed in this mission.
For this mission, it is a toss up as to which class of plane to use. It is a long mission with many adversaries, so a defense class plane comes in handy to stay alive to the end. The down side of using a defense class plane is that you may have trouble protecting your troops with less firepower. The Hawken or similar weapons class plane will give you the best chances of making it thru the mission with all bonuses but an Arbiter will definitely be an easier ride.
Phase 1: Sea Battle at the entrance of Port Crescent
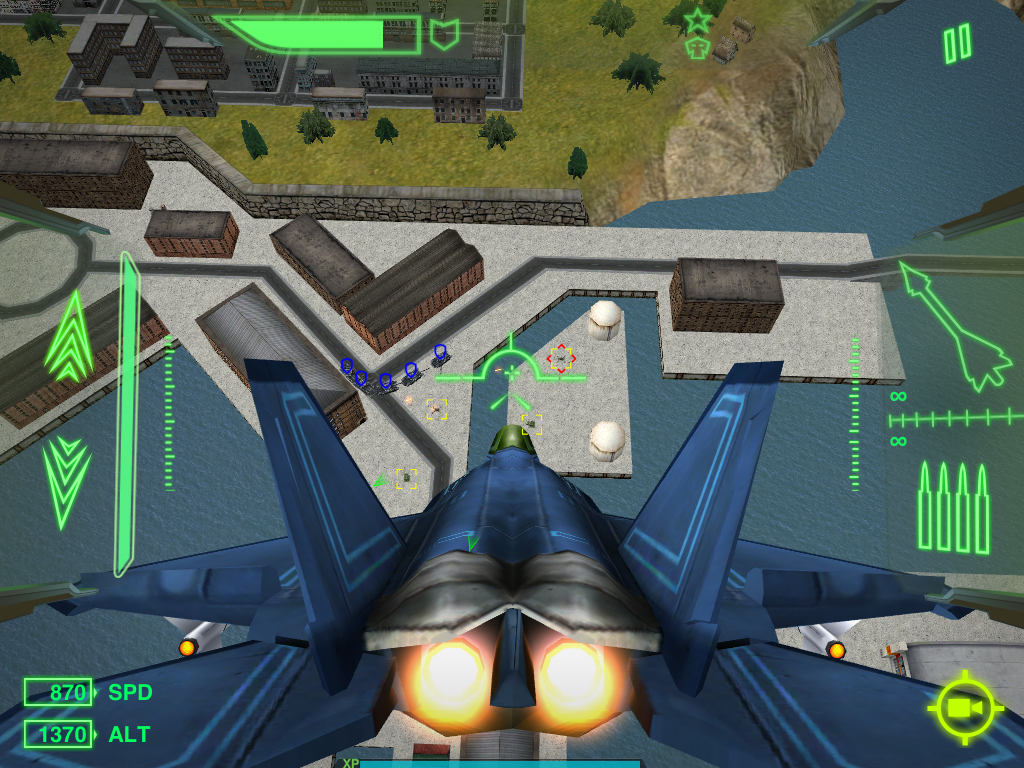
You start this mission approaching the port with your fleet. You and the Helios squadron will face 2 destroyers, 6 ground artillery (3 on each side of the port opening), and a few planes. I usually focus on taking out the 6 ground units first. This allows me to avoid getting hit by side fire when attacking the destroyers. I usually don’t pay much attention to the enemy planes unless they happen to fall into my field of view then I will fire on them, but usually don’t pursue. The key in this phase of the mission is to avoid taking too much damage. If you get beat up here, you will have a hard time making it thru the next 5 phases!
 |
| I chose an Arbiter this time - helped keep me alive during all the screen shots! |
 |
| Usually try to clear out the sea wall first |
 |
| After the sea wall support is gone, I focus on the destroyers |
Phase 2: Deployment of the Assault team
After you complete phase 1, your carrier will dock and an assault team of 5 tanks will be deployed. Your job is to protect this assault team as they advance thru the port to the town square. Try to keep all 5 alive thru the mission as this will give you some Meteor missiles as a bonus at the end.
Also, at this point, you will hear for the first time from the “Matron Mother”. This is an angry governess with a lot on her mind and is not happy with the legion! (see from the banter below). My only gripe here is that you cannot skip thru some of this dialog. If you like to play this mission often to get the credits, you will be forced to listen to the Matron Mothers diatribe over and over – come on Z2Live, what are you doing to us????
 |
| If you play this a few times, you'll know this part by memory |


As for the mission, your first priority will be the airport to your right. Several planes will be taking off to fight against you. If you are quick, you will be able to take out at least one before it is in the air. You will then have to dogfight these planes. NEWS FLASH: Thanks to the commenters, if you blow up the airport BEFORE the carrier docks (phase 1), these planes will all be destroyed early and you will not have to fight them! After that, keep an eye on the assault team as they will run into a small force of ground units before the low bridge. Not too hard to deal with as long as long as you provide air support!
 |
| Hit the planes at the airport first |
 |
| First resistance for tanks - if you have an angle like this, you'll wipe them out quickly |
Phase 3: Engagement at the first factory
After your assault team crosses the first low bridge, you will encounter the first factory and face another series of ground units including a few tanks. With diligent air support, you should be able to take them out fairly easily.
 |
| Resistance at 1st factory - not too bad if you don't stir up hornets nest by shooting at factory at this phase (do it later) |
After you take out the ground units, you will then proceed thru a dark tunnel up to the higher bridge. I’ve never tried flying a plane into the tunnel and am curious if anyone else has? I am guessing that you will blow up, but have never tried to find out! NEWS FLASH: Thanks to the commenters - if you fly in the tunnel, you will come out the others side! As for the village itself, I have tried exploring the other sides of the mountains around the port to see if there are any other hidden items, but have never found any. It seems that Z2 has not placed any surprises out there in these missions. If any readers know of any, please let us all know!
Phase 4: Crossing the high bridge
Once you move up to the top near the high bridge, the Matron Mother will again chime in and command a destroyer to take you on. The destroyer will emerge from around the corner of the back harbor and is easy pickings. A side note: you will get an easy badge if you fly under both the low bridge and the high bridge.
 |
| Destroyer comin' round the bend folks |
 |
| Floating units are easy pickins (if its a bug free run) |
After blowing up the destroyer, the assault team will begin to cross the high bridge. At this point a series of floating rafts appear with artillery on it. You should be able to quickly take them out, although I have run across a bug occasionally where these units don’t seem to want to die despite more than enough attacks against them. Curious if anyone else has run into this issue?
Phase 5: Engagement at the second factory
After the high bridge, you will approach the second factory. Just like the first factory, you will be met with a series of resistance. My recommendation is to take them out and avoid firing on the factory until your troops have passed by. You will have ample time to blow up the factories when your assault team is going thru the tunnels and up to the higher level (this strategy applies to both the first and second factory). Another side note – you can blow up the airport too if you’d like, but it doesn’t seem to give you any benefit. I have not found anything else in the port that can be blown up – have any of you? I’ve even tried to blow up the Legion carrier, but it appears to ignore friendly fire.
 |
| Second factory (this time, destroyed it early while tanks were crossing low bridge to first factory) |
 |
| Taking a few shots at the Legion carrier - that will really chap Durants hide |
Phase 6: Final Engagement at the central square.
After the long slog, you are almost done with this marathon mission. As you approach the square, you will face a few ground units and also 2 tanks that pop up on each side of the square as you get closer. Finish them all off as fast as possible as it sucks to lose a tank at this point in the mission after you’ve come this far! Once you take this last resistance out, congratulations, you have completed the last of the Markovian Campaign missions! There is some final chit chat between Durant and the Matron Mother and then it’s a wrap.
 |
| Final phase - taking out resistance at the town square |
 |
| Matron Mother chimes in one last time |
 |
| Durants final remarks |
 |
| Never quite clear what this means - is that Copperhead sighing because he is not going to get a promotion? |
Summary:
Overall, the Markovian Campaign was a great first campaign. My recommendation would be to have the next campaign be more difficult and offer a variety of scenes. Perhaps have a mission in a dense city full of high rise buildings, or have a mission in a tall forest where you can fly below tree level. The canyon in mission 4 was interesting – that would be a great place to have versus matches. It is unclear when/if Z2 is going to have more campaigns but I sure hope so!
 |
| Honest, I do get the tanks there safely usually when I'm not doing screen shots :-) |
Yes, you can go through the tunnels. You pretty much go right through the mountains untill u end up on the other end. I would like to contact you out side the blog message me at everts97&gmail.com
ReplyDeleteI can produce some pictures with weapons class planes if u are interested. email is alexbot@rocketmail.com
DeleteThe planes I typically use my arbiter or hawken on stocks for this mission. To get the meteor reward you need to escort all tanks to the square safely and this could be done easily using the arbiter. What you need to do is to go up high, come down at the turrets slowly and draw missile/cannon fire from your target in the process. This uses the "SEAD" philosophy and your tanks won't be targeted.
ReplyDeleteUsing hawken is slightly trickier since you don't get regen. What you do instead is spam fire at enemy targets and roll a lot to get the 40% damage reduce that comes with weapons planes.
[SV Cadet sangongchuangnu]
Cant pass this level:(
DeleteMe either
DeleteI did, but I had to use respawns.
Deletei wish you could blow up the matron mother's buldings and fight the tank on the last part, of the last mission, [above]in last picture.
DeletePeople I passed that mission a lot of times with tempest I got eagle I'm saving for dragon
DeleteIf you destroy the airport hangar before the assault been deployed (before ending phase 1 - sinking the two destroyers) then the planes will not show up when starting phase 2, saving your time and armor to protect the tanks thru the city! ;)
ReplyDelete[N.S.F] Vini_Paschoal
finishing this campaign is no big deal , it's keeping the 5 tanks intact ( to get the 15 meteor missiles) that is .
ReplyDeletealready tried to do use the dragon , my whole fleet got destroyed before the assault team deployed ; i have an arbiter , but it's not fully upgraded .
anyway , this is the mission with which i have the more trouble , buut it's always due to the fact that i take too much risks, trying to get the 3 Stars ( i already have) to get the credits the 15 meteors and the Osiris Cannaon ( greed is Gooooooooooooooooood .....)
I do all campaing missions with Eagle-X - it is the only full upgraded weapon class plane in my hangar and its lock range bonus along with the highest damage bonus are very usefull.
ReplyDeleteI can advice next thing. In phase one try to wipe one destror first (with weapon class plane you can do in pretty quick). Then wipe out both rocket batteries (do not destroy guns!) and shoot down planes. Then you can destroy hangar, both factories and all enemies from the first factory. Then kill port defenders. There only one big problem could occure - your fleet can destroy port defence before you can destroy hangar and thus makes you fight enemy interceptors.
By following this advice you will dramatically decrease number of enemies that will attack your tanks and thus you can more easily keep them alive.
TTTriforce
Sorry for my English.
DeleteTTTriforce
You can go through the tunnels! It will take you to where it comes out!
ReplyDeleteGreat blog - thanks for your work! A few other tidbits I've picked up:
ReplyDeleteWhen you take out the hanger before destroying all the port defenses, you avoid the phase 2 fighters, but there will be 3 extra ground cannons that show up in the first traffic circle the tanks pass through. Super easy to take out - you just gotta know they are there, so you can avoid a few unnecessary hits on your precious tanks.
If you get too high and far away from the destroyer as it spawns in the back harbor in phase 4 (like, say, you are off exploring the backside of the island waiting for it to spawn), it will be instantly firing missiles at high rep rate at you. Stay closer to where it spawns, and it won't throw quite as much firepower at you right off the bat. Helpful if you're in a weapons plane and trying to preserve armor for the final phases.
Using a raider, I completed this mission in two tries. The first try failed miserably (destroyed in the first phase). I got destroyed in the second try in the first phase as well but I respawned and completed the mission although I did not complete any of the bonus objectives.
ReplyDeleteGet stuck in the 2nd phase each time; use Arbiter or Hawken.
ReplyDeleteAny tips?
First, you'll need to have 60+ percent of your armor so if you got pwned on the first phase you'll Die quickly.To keep armor in the first phase, get to about 3000 altitude and then dive down at the destroyers. You should be able to make a dozen of so missiles go down at them before they start firing at you. After you get to 600 altitude do back up and repeat the process until you destroy both the destroyers and the ground SAMs and guns.Right after the tanks come in open fire on the airport quickly and you will destroy one or two of the planes on the runway. However don't rush it too fast because they can fire missiles at you when on the runway. After you shoot down the three planes follow your tanks and when enemy tanks and guns appear quickly shoot them with missiles before they get your tanks. gun can stand only one or two hits while tanks and missile launchers can stand three or more. Try to do you tank's job so they won't get knocked out.If one of you tanks get knocked out another will get knocked out soon. Be careful not to crash.You will have to destroy several dozen tanks and guns throughout the mission. When you get to the destroyer try to shoot as many missiles at it as possible and dodge any incoming missiles. The five gun rafts can only take two hits but, they are trying to hit your tanks, not you so wipe them out.
DeleteTips
You have to know the map very well.
Do not panic when you tanks go through the tunnels.
If you destroy the factories fast enough, then some tanks and guns would be destroyed inside it
Use Arbiter
If you die in phrase 4 and you still have 3 or more tanks left, respawn!
because you are faster than your tanks, circle around them, but be ready for tanks and guns.
Scout a little ahead of your tanks so you can destroy tanks and guns before your tanks get destroyed.
Phase 2 is easy-don't worry about the tanks just focus on taking out the planes. I suggest you use a hawken instead of the Arbiter because the arbiter reloads missiles too slowly. Also, the hawken's armor is not bad.
ReplyDeleteAt the end of the mission, the Matron Mother says that their days living under the Legions's thumb are finished-does that mean that there are going to be more missions to do with Port Crescent and the
rebels? Let's hope so.
Thanks :)
DeleteI wish we can be the rebels in the next campaign.
Deletewhen i played this mission some time ago, i only destroyed the airport and one of the factorys, but i still got the bonus objective
ReplyDeleteI have two of three objectives. Can I just go for saving my tanks on one mission or do I have to do all to be successful?
ReplyDeleteYou have to do all the 3 objectives together (during the same mission), I'm sorry.
DeleteWhere in the Sam hell is the tunnel?
ReplyDeleteYour tanks enter the tunnel after the 1st and 2nd factory.
ReplyDeleteI usually leave one destroyer alive in the first phase and destroy the airport and both factories so that I don't have to destroy them when I also have to protect the tanks.
One of my favorite tricks on this mission is to leave just one anti-air alive on the sea wall and kill everything else. The anti-air doesn't do much damage to your ships, so you have quite a bit of time to go clean up the airport and factories. The trick here is to just stay low so it never sees you. Keep out of its sights and it won't target you at all while you clean up in town. When all is clear, come back and pop it off, then half your work is done. I fly a Thresher and can't beat this mission with standard cannon and missiles, they just take too long to finish off foes, but an upgrade to Valkyrie and Phoenix or RAAM picked up in earlier missions gets me through just fine, all objectives met.
ReplyDeleteI go thru the tunnel and everything is glitchy and I die
ReplyDeleteY won't u give out ur game center?
Mine is .:Arman92:.
I completed this quest with only my Annihilator..took me a bunch of tries though..
ReplyDeleteI used tempest one time no respawn I won but I only got one star
DeleteI can complete all the missions except the 2nd one (island factory) with the Hawken (and standard weapons) and get 3 stars. For the island factory mission, I need to use a defense plane (i.e. Dragon with standard weapons) in order to survive the missile and anti-aircraft gun assaults that are bombarding me while I'm trying to knock them out. I don't bother going after the defenses on the shield generator islands or the planes unless they happen to be in my gun sight and locked on. I just concentrate on the shield generators, the buildings and the defenses on the main island.
DeleteTo complete the last mission (Attack on Port Crescent), in phase two, the first thing I do is to go after the enemy planes taking off from the air field. The tanks can easily defend themselves against the guns in the first attack (near the "circle").
After getting rid of all the plane, I quickly gain altitude over the "triangle" where the 2nd attack against the tanks occur. As soon as the matron starts talking, I do a slow dive (holding brakes) down to knock out the guns at the triangle.
After those guns are taken care of, I gain altitude again and wait over the 1st factory until the tanks get there. As soon as the fighting begins, dive down again holding brakes and get rid of the guns and tanks at the factory. After they're eliminated, the tanks will hang around for a couple of seconds before moving on. Use this time to gain altitude again over the factory. When the tanks start moving out towards the tunnel, fire missiles and guns at the factory to blow it up. Then shoot down the tanks and guns that emerge from the factory. Do this quickly and you'll have enough time to go after the battle ship that'll be attacking the tanks as they emerge from the other end of the tunnel.
Repeat the above strategy for the 2nd factory. Dispose of the tanks and guns from the blown factory as quickly as possible so that you can be in position over the square to take out the tanks and guns in the final battle.
This strategy has gotten me 3 stars all the time. Timing is critical here, though. If you attack the factory too early or too late, you're sure to lose a tank or two.
Good luck!
4 some reason my friend can respawn with 0 coins and I have to use 2 to respawn. Anyone know what is going on?
ReplyDeleteabout the surprises, if u fly thru the tunnel and keep going, i thin you will find a ground artillery and a building a.k.a. factory. and i finished this mission with a tempest. took 10 tries
ReplyDeletea.k.a think. sorry i spelled it wrong.
ReplyDeleteI tried to beat this mission with a Viper. Got pwned by the Hawken that comes out of the airport every time.
ReplyDeleteIf you destroy the hanger before your force lands at the harbor the planes won't spawn. You have to weave hitting the hangar in with the other targets or your mission will fail (one of the ships will be sunk). Remember, you can use missiles as du,b rockets when you don't have lock-on.
ReplyDeleteBefore I tried this, I took out all the ground turrets and one destroyer, and I went to clean out the airport. Turns out the destroyer took out the entire force since I didn't cripple it's turrets.(I am the same anonymous above.)
ReplyDeleteA few points on this mission:
ReplyDelete1. Destroy the factory and its defense and the airport in phrase one. But before doing that, kill both fighters, 2 missile turret on the land and other 2 on the ship. Missile does 90% of the damage to your fleet.
2. If you attack from higher places, some turret will target you instead of the tank, so you take the damage not the tank. Make sure using defense class with 4% armor regen so you can get full armor every phrase.
3. Notice that you can go into some of the mountains... lol
When you go thru the tunnels you can't see so I crashed and had to respawn
ReplyDeleteThis mission is really hard but just keep trying and you'll make it.
ReplyDeleteAnyone know if there are 2 bridges? If so, where is the second one?
ReplyDeleteyou can see the two bridges on phase 3 picture (posted on top).
Deletesame thing with me.... free respawn..... only in misson 2
ReplyDeletelol... how did I pass this using my C-101? =S
ReplyDeleteI'm stuck in this mission. It's too difficult.
ReplyDeleteMaybe copperhead is sighing because he misses Vargas!
ReplyDeletei died on phase 6
ReplyDeleteTbh I think this mission is quite easy. I use a fully upgraded Aurora with stock armament.
ReplyDelete1. Kill the missle turrerts on the battleships.
2. Kill the two planes.
3. Kill the missle & gun turrets on the wall.
4. Destroy the hangar.
5. Destroy both factories.
6. Now kill both battleships.
7. Escort tanks, kill any resistance.
8. Mission accomplished!